Assembly of Relay Modules
Caution: This work may only be carried out under the guidance and supervision of a person with professional experience in handling high voltages. Keep in mind that the installation must prevent any contact with the mains voltage and the possibility of a short circuit between the high voltage and the low voltage section, even in the case of improper handling by non-professionals or children..
Great safety can be achieved by installing relay modules in closed power outlets or conductor rails. It is particularly important to ensure that the cables of the high-voltage section do not come into contact with the low-voltage section under any circumstances, even during prolonged operation and vibrations (cable strain relief, fixing of the relay module, etc.).
A simple and cheap installation option using a mechanical timer module is described here. Devices with 4 housing screws instead of snap locks are better protected against unintentional opening. The breakout board of Seed is used as relay, which has a Grove connection and can be operated without an extra driver via any GPIO pin (consuming only a few mA).
Step-by-step instruction:
| 1. |
|
|
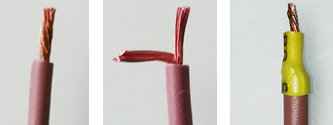
| 2. | Cut the high voltage cable to the correct length and strip the insulation. Usually the cable is too thick to fit into the relay screw terminal. Therefore, cut off part of the strands and wrap the end with shrink tubing.
|
|
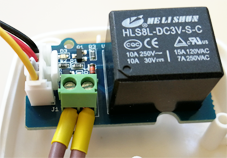
| 3. | Screw the two high-voltage cables to the screw terminal of the relay. Tighten the screw well and check with a slight pull whether the cable is really stuck. Plug in the Grove cable. Cut away the white cable. |
|
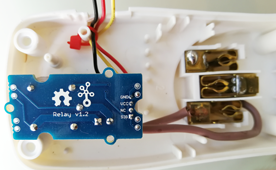
| 4. | Relieve the Grove cable with a cable strap, place the relay and screw down the housing. It needs some force, because the relay is clamped.
|
|
| 5. | Assembly is finished. |