
| Deutsch English |
3. Sensors
| Sensors are measuring instruments for physical quantities such as distance, light intensity, temperature, humidity, etc. They usually convert non-electrical physical values into electrical signals and deliver the result to a microprocessor. The mbRobot has a built-in ultrasonic sensor for distance measurements and two infrared sensors,to detect a white or black floor. In addition, the acceleration and compass sensors of the micro:bit can be used. | 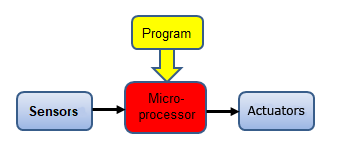 |
Many other sensors can be connected via the I2C interface as described in the later chapters of this tutorial.
Ultrasonicsensor (Distance sensor)
The ultrasonic sensor determines the distance to an object by the time it takes for a short ultrasonic pulse to travel from the sensor to the object and back again. The ultrasonic sensor of the mbRobot can measure distances in the range of 2 cm to approx. 100 cm. The function getDistance() returns the distance in cm. Typically sensor values are recorded by "polling", i.e. they are interrogated again and again in an "endless" loop.
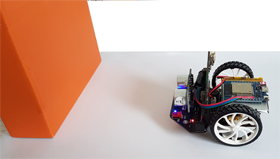
Example 1: Detecting an obstacle
The robot moves forward and measures the distance to objects in front of it. If the distance is less than 20 cm, it travels back a short distance and then forwards again.
# Mr3a.py from mbrobot import * setSpeed(15) forward() while True: d = getDistance() print(d) if d < 20: backward() delay(2000) forward() delay(100) |
|
Explanations of the program code:
| d = getDistamce() Distance to the obstacle in cm | |
| sleep(100)The sensor value is queried every 100 milliseconds. This sleep() command prevents the microcontroller from wasting too much time in the loop which could result in delayed reactions to other commands, e.g. the abort of the running program at the next program download | |
| while True: An "endless" loop. The commands in the indented block are repeated until the power is turned off |
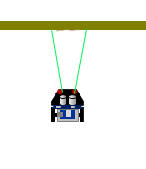
For the simulation we use a horizontal bar instead of an obstacle object, which is created with the following context: target = [[200, 10], [-200, 10], [-200, -10], [200, -10]]
RobotContext.useTarget("sprites/bar0.gif", target, 250, 100)
The two lines must be omitted or out-commented (by an preceding #) for execution in real mode. |
 |
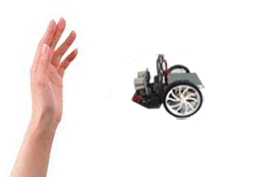
Example 2: A system for controlling the distance to a moving object
The robot should follow the hand movements by constantly trying to keep the distance at about 10 cm. If it measures a distance less than 10 cm, it moves backwards, if it measures more than 10 cm and less than 30 cm, it moves forwards. If the hand is too far away, it stops.
#Mr3b.py from mbrobot import * setSpeed(10) while True: d = getDistance() if d < 10: backward() elif d >= 10 and d < 30: forward() else: stop() delay(100) |
 |
Explanations of the program code:
| d >= 100 and d < 300 Multiple conditions. Can be written 100 <= d < 300 |
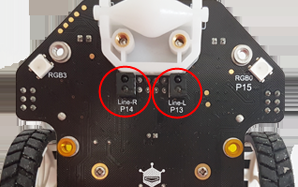
Infrared sensors
These combined infrared emitter/detector are often used as environment detectors. The mbRobot has 2 infrared sensors located at the back of the board (marked Line-R and Line-L). Since the infrared light reflects differently on bright and dark surfaces, the sensors can distinguish between a bright and a dark surface and return a digital value 0 (dark) or 1 (bright)). |
 |
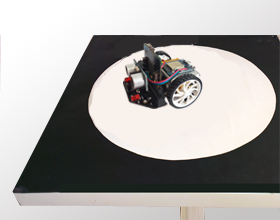
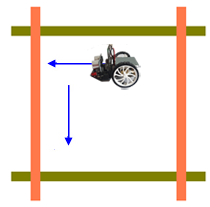
Example 3: The robot reacts to a dark floor
The robot should move endlessly on a square table with a white inner circle without falling down. (It can also be a paper pattern on the floor.) It starts in the middle and goes straight ahead. If it recognizes the edge, it drives backwards, turns about 90 degrees to the left and then drives forward again.
In simulation mode, a background image circle.gif is used, which is inserted as RobotContext at the beginning of the program. For the real mode the line must be omitted or out-commented and the speed adapted.
# Mr3c.py from mbrobot import * RobotContext.useBackground("sprites/circle.gif") #setSpeed(15) forward() while True: v1 = irLeft.read_digital() v2 = irRight.read_digital() if v1 == 0 or v2 == 0: backward() delay(1400) forward() left() delay(550) forward() delay(100) |
 |
Explanations of the program code:
| v1 = irLeft.read_digital() Returns the value of the left IR sensor as digital value 0 or 1. Same as v = pin13.read_digital() | |
| v2 = irLeft.read_digital() Returns the value of the right IR sensor as digital value 0 or 1. Same as v = pin8.read_digital() | |
| if v1 == 0 or v2 == 0: The following program block is executed if the robot has detected a dark background |
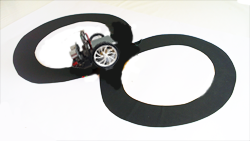
Example 4: Self-driving car
Autonomous vehicles are already a reality today. A complex control process with a huge amount of sensor data is required to ensure that the car is correctly controlled in every situation. The next example shows a very simplified situation: The robot should follow a black track. Using its two infrared sensor it decides whether to drive straight ahead or on the left or right curve.
# Mr3d.py from mbrobot import * RobotContext.setStartPosition(250, 250) RobotContext.setStartDirection(-90) RobotContext.useBackground("sprites/track.gif") state = "GOTRACK" #setSpeed(10) while True: left = irLeft.read_digital() right = irRight.read_digital() if left == 0 and right == 0 and state != "FORWARD": forward() state = "FORWARD" elif left == 0 and right == 1 and state != "LEFT": leftArc(0.1) state = "LEFT" elif left == 1 and right == 0 and state != "RIGHT": rightArc(0.1) state = "RIGHT" elif left == 1 and right == 1: # out of track if state == "LEFT": leftArc(0.1) elif state == "RIGHT": rightArc(0.1) state = "GOTRACK" sleep(100) |
 |
Explanations of the program code:
It is a typical task for state programming. The robot essentially knows four states: The state programming pattern avoids in particular that commands are repeated unnecessarily. If the robot is already moving forward and both sensor values are 0, the forward() command does not have to be called again, but only if the state changes. |
In real mode you have to remove (or out-comment) the three lines with RobotContext and reduce the speed a bit.
Example 5: Find an object and drive there
The robot rotates like a radar antenna at the starting location and searches for an object (target). If it detects an object, it should drive there. As soon as the distance to the object is less than 20, it stops. The program can be executed in real and simulation mode, whereas in real mode the lines with mesh, RobotContext, setBeamAreaColor() and setProximityCircleColor() must be removed (or out-commented). In simulation mode the visible target corresponds to the image file redtarget.gif. The variable mesh defines the coordinates of the corner points that are used for detecting the target. |
|
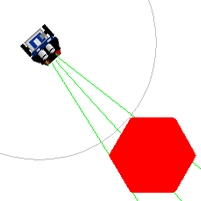 |
First the robot turns to the right. If it discovers a target, it stores the angle, then continues to rotate until the object is lost. It stores this angle too. It then turns back half the difference between the two angles and moves forward until the distance to the object is less than 20.
# Mr3e.py from mbrobot import * mesh = [[50,0], [25,43], [-25,43], [-50,0],[-25,-43], [25,-43]] RobotContext.useTarget("sprites/redtarget.gif", mesh, 400, 400) def searchTarget(): global lt, rt found = False step = 0 repeat: right() delay(50) step = step + 1 dist = getDistance() if dist != -1: #if dist != 255: if not found: found = True lt = step else: if found: rt = step break setBeamAreaColor(Color.green) setProximityCircleColor(Color.lightGray) setSpeed(10) searchTarget() left() delay((rt - lt) * 25) forward() while True: dist = getDistance() print ("Distance = " + str(dist)) if dist < 40: stop() break print ("done") |
Explanations of the program code:
| def searchTarget(): Defines the search algorithm | |
| print "Distance = " + str(dist):The distance to the object is displayed in the terminal window (in simulation mode in TigerJython's message window) | |
| if dist != -1:
If no object is detected, the distance -1 is returned in simulation mode.
Attention: In real mode 255 is returned! |
In real mode you must remove (or out-comment) the mesh and RobotContent lines.
| Exersises: |
1) |
mesh_hbar = [[200, 10], [-200, 10], [-200, -10], [200, -10]] mesh_vbar = [[10, 200], [-10, 200], [-10, -200], [10, -200]] RobotContext.useTarget("sprites/bar0.gif", mesh_hbar, 250, 100) RobotContext.useTarget("sprites/bar0.gif", mesh_hbar, 250, 400) RobotContext.useTarget("sprites/bar1.gif", mesh_vbar, 100, 250) RobotContext.useTarget("sprites/bar1.gif", mesh_vbar, 400, 250) |
 |
2) |
A robot moves in a limited field with the aim of finding the exit. Apply the following strategy: If the distance to the boundary is less than 5 cm, the robot travels back a short distance, turns a small angle to the left and then moves forward again until it succeeds in finding the exit. |
 |
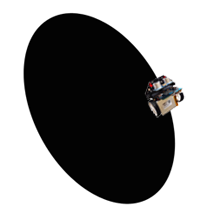
3) |
For the simulation use the background image oval.gif. RobotContext.useBackground("sprites/oval.gif")
RobotContext.setStartPosition(150, 400)
|
 |
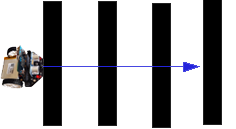
4) |
Remark: The solution is not quite simple. If you use a strip counter and increases it by 1 when the robot sees black, it still sees black when it moves further on the strip. You have to store the current state (on/off the strip) using a state variable. Only if the state changes you continue to count. For the simulation use the background image panels.gif and insert it as RobotContext as follows:RobotContext.setStartPosition(0, 250)
RobotContext.setStartDirection(0)
RobotContext.useBackground("sprites/panels.gif")
|
 |
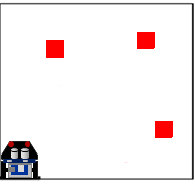
5) |
The robot should find three objects with its ultrasonic sensor. It turns on the spot and measures the distance. When it finds an object, it plays a sound or a melody and continues searching until it has found all three. Solve the task first in simulation mode and use the following code to represent the objects mesh = [[-30, -30], [-30, 30], [30, -30], [30, 30]] RobotContext.useTarget("sprites/squaretarget.gif", mesh, 350, 250) RobotContext.useTarget("sprites/squaretarget.gif", mesh, 100, 150) RobotContext.useTarget("sprites/squaretarget.gif" ,mesh, 200, 450) RobotContext.setStartPosition(40, 450) |
 |