
| Deutsch English |
15. Smart Home 2: Control Devices over the Internet
If the micro:bit is combined with a LinkUp board (ESP32 coprocessor), devices and systems can be controlled via the Internet. There are different scenarios:
| 1. | Using HTTP: A Web server running on the ESP provides a web page with on/off buttons. The browser of a remote manager sends an HTTP request with the switching command as URL file name or as URL parameters. |
| 2. | Use of MQTT: The ESP subscribes to a topic and receives the switching command as on/off messages via the broker. These are published by a remote manager as the value of the topic. |
| 3. | Use of a cloud server (ThinkSpeak): The ESP regularly reads the value in a table using HTTP GET requests. A remote manager sets the switching command as table entry in the cloud. |
In the following examples a LED lamp is switched on/off (see chapter SMART HOME 1) It could also be any other device which is switched by P0 with a digital signal. If you don't have a device, you can see the switching state on the display of the micro:bit as Image.YES and Image.NO.

Scenario 1: Webserver
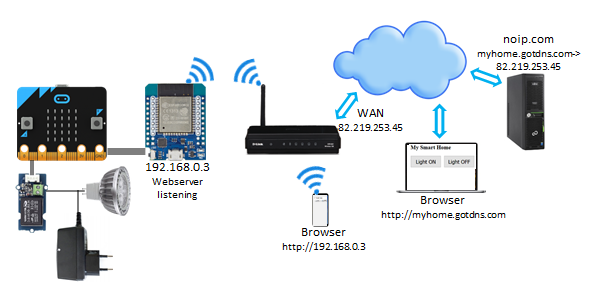
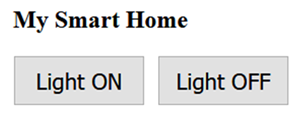
The concept from the chapter Webserver is taken over. Depending on the requirements, the website can be with more or less sophistication, e.g. with two buttons. The HTML code for the website is first copied to the ESP.
# SmartHome3HTML.py from linkup import * html = """<!DOCTYPE html> <html> <head> <meta name="viewport" content="width=device-width, initial-scale=1"> </head> <body> <h2>My Smart Home</H2> <button style="font-size:22px; height:50px;width:130px" onclick="window.location.href='on'">Light ON</button> <button style="font-size:22px; height:50px;width:130px" onclick="window.location.href='off'">Light OFF</button> </body> </html> """ print("Saving HTML...") saveHTML(html) print("Done")zwei Buttons. |
This corresponds to the following display:
The program on the micro:bit starts a Web server:
# SmartHome3.py from microbit import * from linkup import * def onRequest(clientIP, filename, params): if filename == "/on": pin0.write_digital(1) display.show(Image.YES) elif filename == "/off": pin0.write_digital(0) display.show(Image.NO) ipAddress = connectAP(ssid = "mySSID", password = "myPassword") display.scroll(ipAddress) pin0.write_digital(0) display.show(Image.NO) startHTTPServer(onRequest) |
Explanations of the program code:
| display.scroll(ipAddress)): Displays the IP address received from the router | |
| def onRequest(): Callback invoked by a incoming GET request. No return value is necessary, because it is a static (unmodified) web page |
This scenario assumes that the user has access to the Web server. For this, the user must either log on to the same router as the ESP, or the router must be configured so that it can be accessed from outside. The procedure is described here: https://www.tigerjython4kids.ch/index.php..robotik/iot/temperatur.inc.php
It requires the following steps:
- Binding the MAC address of the ESP to a fixed IP address (address reservation)
- Enter this IP as Virtual Server on port 80
- Create an account at noip.com and enter DDNS in the router
Advantages:
- The remote manager is any browser on any platform (also on smartphones)
- No data is transferred in idle state
Disadvantages:
- A single command has relatively large data volume (an entire web page)
- The Web server must be externally accessible for HTTP GET requests
This scenario is recommended if data transfer is relatively rare.
Note: In a variant of this scenario, the access point is started on the ESP. Smartphones, tablets and desktops that are nearby log in to this AP and use the URL: 192.168.4.1 An Internet router is not required.
Scenario 2: MQTT
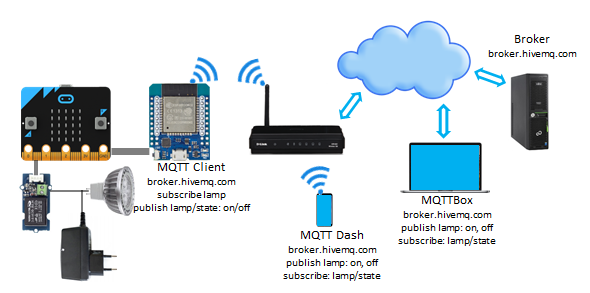
The procedure is described in chapter MQTT Communication. A client is set up on the ESP that subscribes to the /ch/lamp topic and reacts to the payloads on and off. The client sends a ping request to the broker at intervals of about 10 seconds so that the connection is not closed after a certain time.
# SmartHome4.py from microbit import * import mqtt host = "broker.hivemq.com" topic = "/ch/lamp" mqtt.connectAP("mySSID", "myPassword") mqtt.broker(host) mqtt.connect() mqtt.subscribe(topic) pin0.write_digital(0) display.show(Image.NO) count = 0 while True: count += 1 if count % 10 == 0: mqtt.ping() topic, payload = mqtt.receive() if topic != None: if payload == "on": pin0.write_digital(1) display.show(Image.YES) elif payload == "off": pin0.write_digital(0) display.show(Image.NO) delay(1000) |
Explanations of the program code:
| if count % 10 == 0: A ping is sent after every 10 loop passes of approximately 1 s | |
| if topic != None: If no message was received, receive() returns the tuple (None, None) If the broker closes the connection, it returns None and the program terminates. To make the system robust, the client should restart in case of errors. |
Robust client:
Instead of a ping, a status message with the topic /ch/smarthome/state is sent approximately every 10 seconds. A try-except structure is used to restart the communication is something goes wrong.
# SmartHome5.py from microbit import * import mqtt, sys host = "broker.hivemq.com" topic_switch = "/ch/lamp" topic_state = "/ch/lamp/state" pin0.write_digital(0) display.show(Image.NO) while True: try: print("Connecting to AP...") if mqtt.connectAP("mySSID", "myPassword"): print("OK. Connecting to broker...") mqtt.broker(host) if mqtt.connect(): print("OK. Connection to broker established") mqtt.subscribe(topic_switch) count = 0 state = "OFF" while True: count += 1 if count % 10 == 0: print("Publishing topic:", topic_state, "payload:", state) if not mqtt.publish(topic_state, state): print("Error. Publish failed") break data = mqtt.receive() if data == None: print("Error. Connection to broker lost") break topic, payload = data if topic != None: print("Got topic:", topic, "payload:", payload) if payload == "on": pin0.write_digital(1) display.show(Image.YES) state = "ON" elif payload == "off": pin0.write_digital(0) display.show(Image.NO) state = "OFF" delay(1000) else: print("Error. Broker unreachable") else: print("Error. Can't connect to AP") except Exception as e: sys.print_exception(e) |
Explanations of the program code:
| while True: The program will always create a new connection if an error occurs | |
| mqtt.publish(topic_state, state): The client publishes its state approximately every 10 seconds. This also ensures that the connection remains open without ping. An external client can check if the system works subscribing /ch/smarthome/state |
As usual, the switching commands can be issued by an MQTT client running on a PC (e.g. with MQTTBox) or on a smartphone (e.g. with MQTT Snooper or MQTT Dash).
Advantages:
- The remote manager is any MQTT client on any platform
- A single command has very small data volume
Disadvantages:
- An external server is required (MQTT broker)
- Even in idle mode, data is transferred (ping or publish) to keep the connection open
Scenario 3: Cloud Server
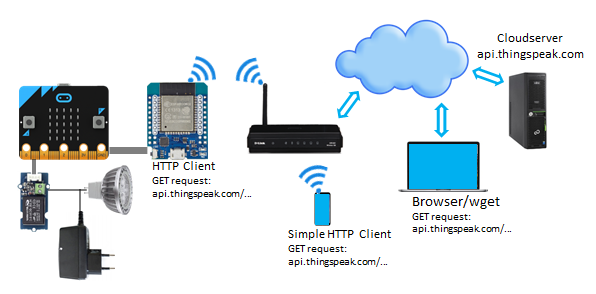
Data is stored on an external server and can be read and modified equally by the micro:bit and the remote manager. This makes it possible to exchange information. Here the ThingSpeak cloud server is used, as described in the chapter Cloud Computing . The first step is to create an account and define a channel that has the only Field1.
The remote manager writes either the number 1 or 0 into this field, depending on whether the micro:bit has to carry out a switch on or off command. To do this, the micro:bit reads the value in short intervals with the following program:
# SmartHome6.py from linkup import * from microbit import * readKey = "B1DYQYCZUGF0H3UZSL" channelID = "8042864" def extractValue(response): try: start = response.find('{') end = response.rfind('}') dataDict = eval(response[start : end + 1]) return dataDict['feeds'][0]['field1'] except: return "" pin0.write_digital(0) display.show(Image.NO) print("Connecting to AP...") if connectAP("MySSID", "MyPassword"): print("Connecting to AP successful") while True: url = "http://api.thingspeak.com/channels/"+channelID+"/feeds.json?api_key="+readKey+"&results=1" response = httpGet(url) print("got response:", response) value = extractValue(response) print("got value:", value) if value == '1': pin0.write_digital(1) display.show(Image.YES) elif value == '0': pin0.write_digital(0) display.show(Image.NO) delay(5000) else: print("Connection to AP failed") display.show(Image.SAD) |
Explanations of the program code:
| response = httpGet(url): The format for reading data is taken from the channel definition in the ThingSpeak account: http://api.thingspeak.com/channels/CHANNNELID/feeds.json?api_key=READKEY&results=1 where CHANNELID and READKEY must correspond to the current values. The server returns a string in JSON format as a response. This part begins and ends with a curly bracket | |
| extractValue(response):The JSON line is removed from the response string and converted into a Python dictionary with eval(). The desired information is then taken from this dictionary. If something goes wrong and an exception occurs, an empty string is returned |
The remote manager is an application that sets the value in the table to 0 or 1. According to ThinkSpeak's specifications, the GET request must be
http://api.thingspeak.com/update?api_key=WRITEKEY&field1=VALUE
where WRITEKEY is the Write API key of the channel and VALUE is either 0 or 1.
To test, you can enter this line in a browser's URL. To execute the switching with one mouse click, there are several ways to execute the GET request:
- Save a browser page with the URL as a link
- Install the wget application and write a script that calls wget<getrequest> wget <getrequest>
- Install a simple HTTP GET client on smartphones, e.g. Simple HTTP Client (Microsoft)
- With TigerJython the GET Request can be submitted easily by a Python program, even with a GUI interface, as seen below:
# SmartHome6GUI.py from tcpcom import * from entrydialog import * url_on = "http://api.thingspeak.com/update?api_key=0IKY85R1E3AO403U&field1=1" url_off = "http://api.thingspeak.com/update?api_key=0IKY85R1E3AO403U&field1=0" btn1 = ButtonEntry("On") btn2 = ButtonEntry("Off") pane1 = EntryPane(btn1, btn2) dlg = EntryDialog(pane1) dlg.setTitle("Remote Lamp Manager") while not dlg.isDisposed(): if btn1.isTouched(): HTTPClient.getRequest(url_on) elif btn2.isTouched(): HTTPClient.getRequest(url_off) |
The program shows a dialog with two buttons that can be clicked to switch the lamp on or off.

Advantages:
- It is modern to exchange information via a cloud server
- Both ESP and remote manager are simple HTTP clients
Disadvantages:
- An external cloud server is required
- Data is also transferred in idle mode, as the ESP must regularly read the information in the cloud
- Setting up the remote manager is not quite easy